How to Add Voiceover and Subtitles to Your Slides with Zendeck's AI
How to Add Voiceover and Subtitles to Your Slides with Zendeck's AI
You've finally finished that deck. The content is solid, the design is clean, and you're proud of it. Then someone says the magic words: "Can we turn this into a video?"
Let's be real — that's where the joy dies. Recording your own voiceover means setting up a microphone, rehearsing lines, and redoing takes every time you stumble. And subtitles? Manually timing captions to match your narration is the kind of task that makes you question your career choices.
But here's the thing: it doesn't have to be that way. Zendeck's PPT-to-video feature combines AI speech synthesis and auto-generated subtitles into a single workflow. You upload your deck, pick a voice, and the tool builds a narrated, captioned video for you. No studio, no microphone, no captioning software.
This guide walks you through the whole process — from preparing your slides to exporting a polished MP4 — so you can turn any deck into an accessible micro-course in minutes.
01 Why Voiceover and Subtitles Matter More Than Ever
Here's a scenario you've probably lived: you share a silent slide deck with your team or students, and it gets skimmed once, then forgotten. Now imagine the same content with a clear voiceover and on-screen subtitles. People watch it. They retain it. They come back to it.
Adding a voiceover and subtitles is no longer a "nice to have" — it's the difference between a deck that gets watched and one that gets skipped.
There are two forces driving this shift. First, accessibility. Subtitles aren't just for people with hearing impairments — they help everyone watching in a noisy office, on a commute, or with the sound off. Accessibility standards like WCAG are becoming the baseline for corporate and educational content, and captions are a core requirement. If you're building training or courseware, this matters more every year.
Second, engagement. Tools like Visla and HeyGen have shown how powerful the "slides to video" workflow can be: upload your deck, pick a voice, and let the AI organize your slides into scenes with narration. The demand is clearly there. What's changed is that this capability is now built directly into slide creation tools like Zendeck, so you don't need to jump between platforms.
The outcome is simple: a narrated, captioned video that respects your audience's time and attention — and meets accessibility standards without extra effort.
02 What You Need Before You Start
Before you open Zendeck, gather three things:
- A finished deck — your slides should be in their final or near-final state, since the video is built from them.
- Speaker notes or a script — even a rough bullet list helps the AI generate a natural-sounding narration. If your notes are thin, Zendeck can help you auto-generate speaker notes from your slide content.
- A clear idea of your audience — this determines the tone, pacing, and voice you'll choose.
That's it. You don't need a microphone, an audio editor, or a captioning tool. Everything happens inside Zendeck.
One honest tip from someone who's done this the hard way: don't over-polish your script before you start. The AI voiceover handles natural phrasing well, and you can always tweak the generated narration afterward. Get a rough version out first, then refine.
03 How to Add AI Voiceover to Your Slides in Zendeck
This is where the magic happens. Zendeck's PPT-to-video feature takes your existing slides and turns them into a narrated video. Here's the step-by-step:
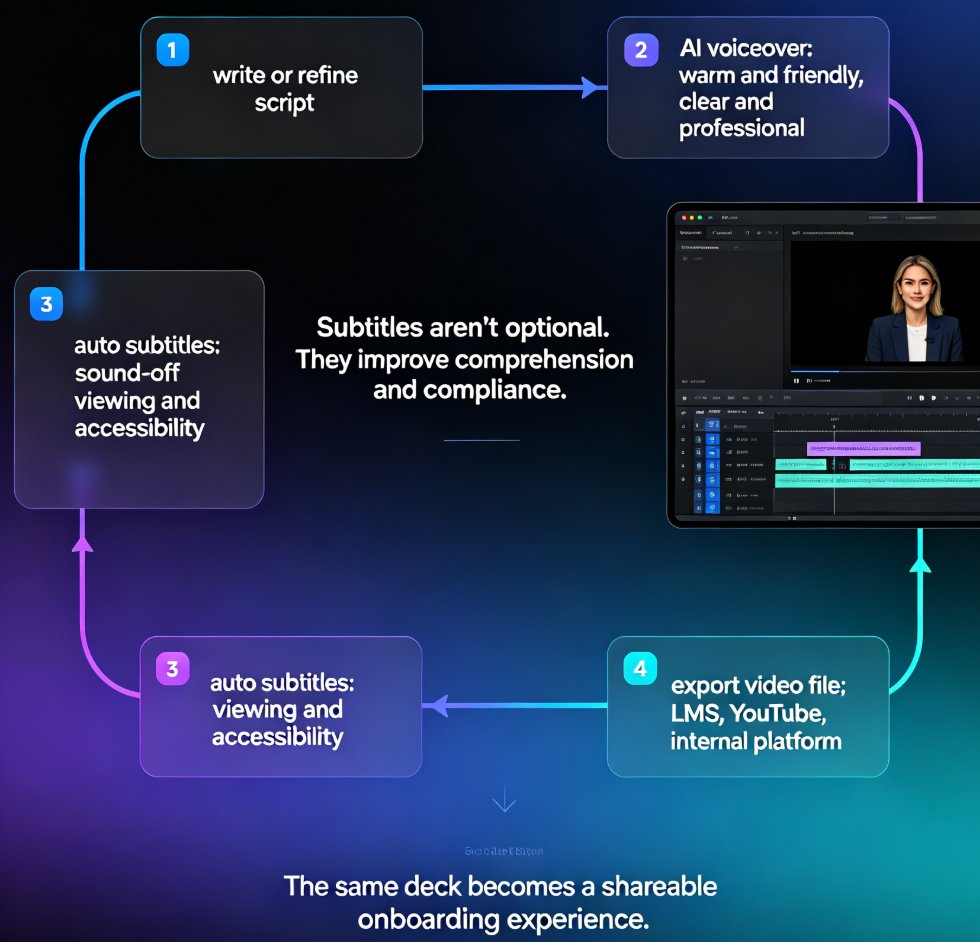
Step 1: Open your deck and launch PPT-to-video. From your Zendeck workspace, open the presentation you want to convert. Look for the PPT-to-video option in the toolbar — this is your entry point to the video workflow.
Step 2: Choose your voice. Zendeck offers a range of AI voices. Pick one that matches your content's tone — a warm, conversational voice for training, a confident one for product demos, a calm one for compliance material. You can preview voices before committing, so take a minute to listen.
Step 3: Set the pacing and duration. Decide how fast each slide should move. Zendeck lets you control the rhythm, so a dense data slide can linger while a simple concept slide moves quickly. This is where you shape the viewer's experience.
Step 4: Generate the narration. Hit generate, and Zendeck reads your slide content and speaker notes to produce the voiceover. The draft is ready in moments — no retakes, no dead air, no "um" to edit out.
If you want a deeper dive into the narration options, check out our guide on adding narration to your slides.
The result? A clean, professional voiceover that sounds like you actually recorded it — minus the two hours of retakes.
04 Auto-Generated Subtitles: From Speech to Text in Seconds
Now for the part that used to be the worst: subtitles. Manually typing captions and syncing them to audio is tedious, error-prone work. Zendeck eliminates it entirely.
With Zendeck, subtitles are generated automatically from your voiceover — no manual captioning, no timing headaches.
Here's how it works:
Step 1: Enable subtitles. In the PPT-to-video editor, turn on the subtitle option. Zendeck's speech recognition transcribes your AI voiceover into text automatically.
Step 2: Review the captions. The subtitles appear synced to the narration, timed to each scene. You can read through them to catch any misheard words or awkward line breaks.
Step 3: Edit in place. If something needs fixing, you can edit the subtitle text directly in the editor. The timing stays locked to the audio, so you don't have to re-sync anything.
This matters more than you might think. Accessible content isn't just a compliance checkbox — it's a quality signal. If you're creating training or educational material, captioned video is increasingly expected. Our guide on WCAG-compliant presentations covers why this is becoming the new standard.
The outcome: your video is accessible to viewers with hearing impairments, people watching on mute, and anyone who prefers reading along. All without a single manual caption.
05 Fine-Tuning: Pacing, Voice, and Subtitle Sync
The first draft is rarely perfect, and that's fine. Zendeck's editor gives you control over the details that separate a good video from a great one.
Adjust pacing per scene. Some slides carry more information than others. If a slide is dense, slow it down. If it's a simple transition, speed it up. This keeps the viewer's attention where it belongs.
Swap voices if needed. Maybe the first voice you picked feels too formal, or too casual. You can change it and regenerate the narration without rebuilding the whole video.
Polish the subtitles. Check for line breaks that split awkwardly, and make sure captions don't cover important visuals. Small tweaks here make the video feel professionally produced.
Preview before exporting. Watch the full video once with subtitles on. Listen for pacing issues, and confirm the captions match the narration. This is your last chance to catch anything before you share it.
A friend's advice: don't obsess over perfection here. Your audience cares about clarity and flow, not about whether every comma is in the right place. Get it to "really good" and ship it.
06 Export, Share, and Measure
Once you're happy with the video, it's time to get it out into the world.
Export as MP4. Zendeck renders your narrated, captioned video into a clean MP4 file you can download and use anywhere — your LMS, YouTube, internal training platform, or a client portal.
Share via link. If you're collaborating with a team, you can share the video directly from Zendeck. This is especially useful for interactive training modules where you want to iterate with stakeholders before finalizing.
Reuse and update. Here's the real win: because the video is built from your slides, you can update the deck and regenerate the video whenever content changes. No more re-recording voiceovers because a number changed on slide seven.
If you're building a series of micro-courses, this workflow scales beautifully. Start with a micro-course from scratch and use the same voiceover-and-subtitle pipeline for every module. Your learners get a consistent, professional experience across the whole series.
Manual vs. Zendeck AI: The Time Difference
Let's put this in perspective. Here's what the traditional workflow looks like compared to Zendeck:
| Task | Manual Workflow | Zendeck AI Workflow |
|---|---|---|
| Voiceover | Record, retake, edit audio | Pick a voice, generate |
| Subtitles | Type and time captions manually | Auto-generated, edit in place |
| Audio-video sync | Manual alignment | Automatic |
| Tools needed | Mic, audio editor, caption software | Zendeck only |
| Time for a 20-slide deck | ~120 minutes | ~8 minutes |
That's not a small improvement. That's a workflow that goes from "I'll do it this weekend" to "done before lunch."
The 93% time reduction isn't just about speed — it's about what you do with the hours you get back. Instead of recording and captioning, you can focus on improving the content, adding interactive elements, or building the next module.
FAQ
Does Zendeck generate subtitles automatically? Yes. When you create a video with Zendeck's PPT-to-video feature, the AI transcribes your voiceover and generates subtitles automatically, synced to each scene. You can edit the caption text directly in the editor without re-syncing.
Can I choose the voice for my AI voiceover? Absolutely. Zendeck offers multiple AI voices, and you can preview them before generating. You can also change the voice after generating and regenerate the narration without rebuilding the video.
Do I need a separate tool to add narration to my slides? No. Zendeck handles everything — voiceover, subtitles, and video rendering — in one place. You don't need a microphone, audio editor, or captioning software.
Can I edit the subtitles after they're generated? Yes. The subtitle text is fully editable in the PPT-to-video editor. The timing stays locked to the audio, so you only need to fix the text, not the sync.
What formats can I export? Zendeck renders your video as an MP4 file, which you can download and use in your LMS, on YouTube, or on any other platform. You can also share the video directly via link for collaboration.